Sugar Cookies for Everyone!

Hey friends! I’m going to share some baked goodies with you guys! It is that season after all! I altered this recipe from one I found here at babble.com. Originally they were for vegan cookies but I’m also gluten and lactose intolerant so I altered them to something I can eat. They came out wonderful and so did the chocolate icing I put on them.

Ingredients:

3/4 c. brown rice flour
1/2 c. white rice flour (you could probably also substitute tapioca flour)
1 1/2 t. xanthan gum
1/2 c. sugar
1/2 t. baking soda
1/2 c. earthblend or other vegan/lactose free butter
1 t. vanilla
a few T. water until it holds together. I ended up using about 3 or 4 tablespoons

Directions:

Mix all the dry ingredients together in a stand mixer or large mixing bowl.

Chunk up the butter and add it to the bowl, mixing it until it’s all combined.

Add your vanilla and mix on low, slowly adding in a tablespoon of water at a time until the dough comes together, but isn’t sticking to the sides. I’ve found that with gluten free cookies it takes a bit more work to get everything to come together properly.

Once it’s all together in a ball, work it into a log shape on some plastic wrap and seal it up.

Put it in the freezer until it solidifies a bit, or keep it in the fridge overnight. Gluten free dough is more crumbly than regular cookie dough, so if you freeze it, it may fall apart when you try to cut it.

After its set up slice the log into about 1-4-1/2 inch slices and place on a baking sheet with parchment paper. The original recipe called for rolling out the dough and cutting it with cookie cutters. You can try to do this but the dough is pretty fragile and might not hold up so well. When rolling, place the dough between two sheets of wax paper to prevent it sticking. This also helps hold the dough together a little better.

Bake at 350 for 10-12 minutes.

For the Icing:

1 c. powdered sugar1 1/2 T. cocoa powder1 t. vanilla2 1/2 T. water.

Put the powdered sugar and cocoa together in a bowl and add in the vanilla. Slowly add in the water until you get a thick but spreadable icing consistency.

It’s always tricky when I make icing because I don’t always want the same consistency depending on what I’m making. I’ve found that this gives me and icing that’s spreadable enough to put on warm cookies and cools to a nice firm and glossy icing layer. You may want to add more or less water depending on how thick you want your icing to be.

Fitness Update: Week Two Complete – Seeing results!

Hi friends!

I’m doing a short post for my third check in and the end of my second week. I’m extremely excited to write this week because I’m finally seeing some physical changes in my body. I’ve lost two and a half pounds plus half an inch(!!!) off of my upper arms and about a quarter inch off my waist. Small numbers to some but to me it’s a big achievement and a great motivator. It came at a good time too because I was starting to get a little discouraged after I had no changes at all for my first check in. I’ve always heard it takes two weeks for you to notice changes, four weeks for close family and friends, and 6 weeks for acquaintances to notice any difference. If you’re just starting your fitness or weight loss goals hang in there! We’re all used to getting so many things instantly that it makes us a little impatient to wait for things now, but I promise if you stick with it and are dedicated you will see the results in time.

This has also kind of turned from a 30 Day Shred goal to a 30 Day Shred plus other fun exercises thrown in type of goal for me. I’m the type of person that gets extremely bored, extremely fast and it seems to be doubly so for exercising. Doing the same 30 Day Shred video every day has gotten boring so I’ve been mixing it up. I went Monday to a skyrobics class with some friends and if you’ve never tried it before, I strongly suggest that you do. It’s basically your entire workout on a trampoline. I went to Skyzone here in Mississauga and your first class is only $5. The class was an hour long but it felt like I was only working out about 20 minutes. Having fun and taking your mind off how taxing exercise is can help you go the extra distance. You might check to see if your local fitness center or even your local YMCA has any classes available.

That’s all for this check-in, I’m off to start level 2 today so wish me luck!!! I’ll see you all Friday with the first Holiday recipe post!

Amber

Christmas Decorating Ideas

Hello friends! I just wanted to share with you guys how I did my centerpieces for my coffee table and side tables in the living room, as well as my fireplace decorations. That will cover just about all of the Christmas decorations that I have up so far.

Here’s the runner that I have on the coffee table. It came with a big ugly crease down the center. I don’t own an iron, but I do own a straightener, and at the lowest setting a hair straightener will work just fine!

Image

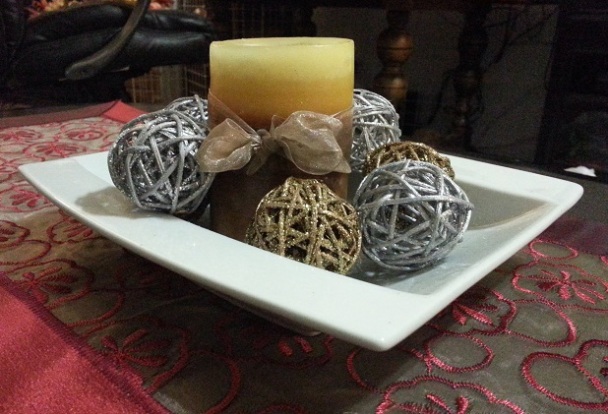
Here’s the arrangement that I made for the center of the coffee table. I was super happy when I found the silver and gold balls at dollarama. I just laid them around the candle on the decorative plate. If you have kids, or pets like me you may want to anchor them down. I ran out of hot glue so each of them are tied together with a thread and then the thread is wrapped around the candle. That way little hands (or paws) can’t knock them off. I try to use the same ribbons throughout all my decorations, so I wrapped the candle and made a little bow with the same ribbon from my holiday wreath. A green or other holiday themed candle would probably work better but I absolutely love this candle and leave it out all year round.

Image

For my side table I took another vanilla candle and tied a ribbon around it into a bow. instead of leaving the ends of the bow hanging out, I folded them up and under the create a big bow. I then just added sprigs and pine cones around it to make it a little more festive and fill up the decorative plate.

Image

Here’s the entire side table all together. The tree was originally just colored glittery thread in the shape of a tree. I took some garland and wove it into the threads to make it look like an evergreen tree, then added ribbon and beads as well as some miniature ornaments. Our apartment is too small to have a real tree, so this is as close as I can get!

Image

Then my absolute favorite part of the whole apartment, the fireplace!

Image

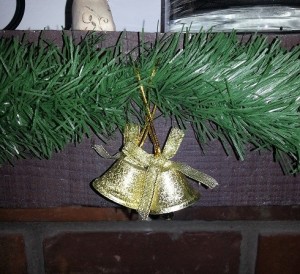
I added garland around the front with two pine cone ornaments and bell ornaments in the center. The vase has small ornaments stacked on the bottom with a poinsettia garland wrapped around the center. I found a pretty noel ornament and wrapped some ribbon around the vase and attached the ornament to it. Here’s a close up view of the vase:

Image

That’s all I have for now, but all of December I have posts dedicated to spreading the holiday spirit! Starting This week every Monday will be a craft related idea and each Friday will be a holiday themed recipe. Till next post!

Amber

Fitness Update Week #1

Hi guys! I just wanted to post up an update for how the 30 Day Shred is going for me. It’s been a little over a week now, I tried to make a video but things just weren’t cooperating with me so I’m just doing a regular post. So far I haven’t really lost any weight or inches, but I have noticed a massive improvement in my flexibility. I’m able to get my legs farther apart when I’m sitting and doing cool down stretches, and I can finally touch my toes! Just barely but that is something, lol. When I first started I could get a little over halfway between my knees and my toes. I also wanted to share some tips of how I’m changing things up and making my workouts go by easier.

One: Set an alarm for yourself so you remember to work out around the same time each day.

My alarm is set for 6pm each day and I left a motivating message for me to get inspired to workout. I also set a second alarm for about an hour and a half later just in case I’m lazy and try to get out of it.

Two: Don’t be afraid to get interactive.

You know how the instructors in your videos are always talking to you and encouraging you? Talk back! I’ve found that when I repeat the incentives they tell me I don’t focus on how tired or sore or bored I am while I’m working out. Jillian Michaels will say: “You got this! This is eaaasssyy for you!” and I say: “This is easy for me! I got this!” I know it feels silly, but it works.

Three: Add your own music.

This works well especially if your repeating the same workout and don’t really need to hear everything that’s said. Turn on your favorite pump up music and get moving. Want to work out to old school yodeling or crazy dubstep? I won’t judge, I do my exercises to 80’s hair bands and modern rock.

Four: Stretch, Stretch, Stretch. (after your workout)

The first couple of days I don’t think I stretched nearly enough, and I paid for it. Now I make sure to spend at least 5-10 minutes after my workout just doing stretches and limbering up. Don’t push yourself too far, and don’t bounce in order to make a stretch. Go until it just starts to feel a bit uncomfortable and hold it there for at least ten seconds. I’ve found that to be the most effective way for me to stretch. Just remember your limits with anything you do while working out.

Holiday Wreath With Lights

Hello again!

As you know I went to Michael’s and Dollarama yesterday to get some new goodies for Christmas decorations and I may have went a little overboard, lol. But… that just means more cool stuff to share with you guys! The first Christmas craft post I’m going to do is for a lighted wreath. I found little battery operated holiday lights at the Dollarama for $2 and decided they would look adorable around my wreath.

The wreath itself came from Michael’s for $4.99 as well as the ribbon I used which was originally $6.99 but I used a 50% off coupon that you can find here until November 21st. For the US coupon you can click here. Everything else I used came from the Dollarama. I got the lights, a poinsettia garland and a holiday berry garland.

  20131117_155717

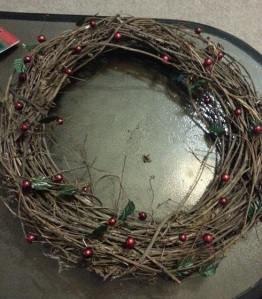
First off I wrapped the berry garland around my wreath. I realized after I got home that I was down to my last stick of hot glue so I just wound it into my wreath. The stem has wire inside so it stayed really well, but you’ll probably want to hot glue it down.

  20131117_161919

Next, I pulled off all of the decorations that were on the poinsettia garland because the plastic stems to me look a little tacky, plus it didn’t wind around the wreath very well.  I put them all in a big pile next to me then started hot gluing them onto my wreath one by one.

20131117_161939

I tried put leaves under each flower and berry cluster and made sure to leave a gap where I wanted the ribbon at the top to be.  Then I took my ribbon and cut lengths just long enough to wrap around the wreath once. Any bare section got a bit of ribbon. I took my lights and poked them through the wreath from the back in order to hide the wires and tucked the battery box into the side. Lastly I made the big bow at the top and a loop to hang it on the wall and it was all done! Here it is with the lights turned off and with them on.

20131117_164602 20131117_164624

Christmas Decoration Haul!

Hey all!

Today I just wanted to share with you all the goodies that I picked up and give a little sneak peek at some of the Christmas decoration ideas I have planned to show. Over the next week or two I’ll be posting up all about the decorations I’m doing for Christmas time. I got super excited while I was out because I found so many awesome things to use. Tomorrow I’ll share with you guys how I made my wreath that’s hanging over my fireplace.

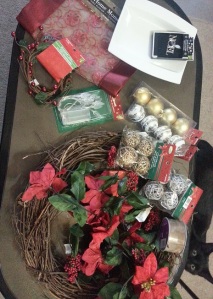
Here’s some things that I already had in my holiday trunk as well as all the stuff I picked up today and where I got it all:

   20131117_16005220131117_16010320131117_160101

Here’s all the stuff I got out shopping today:

From Michael’s: Wreath: $4.99, Ribbon: $3.50 (after coupon)

From Dollarama: 2 Poinsettia Garlands: $2.00/ea, Berry Garland: $1.00, Lights: $2.00, 2 Gold and Silver Ornaments: $1.00/ea,

Noel Ornament: $1.25, 2 Gold and Silver Decorative Balls: $1.00/ea, Red Table Runner: $2.00, Decorative Plate: $2.00, My cat Tucker freaking out over the glitter: Priceless.

Things I had already:

I had quite a few things left over from last year that I absolutely love.

20131117_205916 Justin’s mom got us these for Christmas last year, I have them on top of our tiny tree.

20131117_205908 These are the other decorations I have on our little tree, along with the red beads and ribbon you can see in the background. There’s other silver ones but they’re shiny and you can see the camera, lol.

20131117_205612 My snowman night light. Justin’s mom got this for me for Christmas last year as well.

20131117_205526 I picked this up at the Dollarama last year, but I can’t find the same ones this year. I love this one more than what’s currently out.

20131117_205718 Justin already had this when we moved in together, but I absolutely love it. Mainly because Santa is holding a bunny, lol.

20131117_205805 The quirky snowman potholder that was a gift from Justin’s mom. She loves snowmen like I love bunnies, lol. I’m too nervous to put any hot pans on it so it’s a decoration in the living room.

20131117_205500 20131117_205451 Little bells and a pine cone decoration I picked up at Dollarama. They decorate the garland around the fireplace.

20131117_210051 And the decoration that’s over our entryway. You’ll have to excuse the giant piece of packing tape, I ran out of less obvious scotch tape but I still wanted to put it up, lol. I just used two little sprigs I picked up from the Dollarama and added gold bells and ribbon from Michael’s.

And that’s all I have for now! I’ll have my wreath tutorial up tomorrow and Wednesday I’ll see you guys again for an update on how my workouts are going.

Till next post!

Amber

Get Fit With Me!

Hello there! This is my first video post for the site, just going over a new section I’d like to add to the site about fitness. I started doing Jillian Michaels 30 Day Shred and am going to be posting my updates and invite you to join me in getting fit and being healthy! I’m also talking about what’s coming up for the site and the future posts that I have planned for you guys. Till next post!!

Amber

Quick Lactose Free Vanilla Pudding

I haven’t posted in a couple weeks, I’ve been neglecting the site something awful. I was going through some of my recipes and re writing them to be a little neater and thought I’d share this one with you all. Especially since it’s getting colder outside eating this pudding while it’s still warm is a treat. This is just how I like to whip it up some times and is a recipe that I’ve come up with on my own but I based it on a fairly simple regular pudding recipe. I suppose this also counts a vegan as it omits using any eggs. (Fact of the day: adding in eggs would make it a custard!)

Lactose Free Vanilla Pudding:

Ingredients:

1/3 cup sugar

3 Tablespoons corn starch

1/4 teaspoon salt

1 1/2 cups vanilla soy or vanilla almond milk (you can use just plain milk here but I love the extra vanilla and sweetness)

1 cup coconut milk

1 1/2 teaspoon vanilla

Directions:

Add the coconut milk and 1 1/4 of the soy/almond milk to a sauce pan and bring it just to steaming . Set the remaining milk aside in a bowl, we’ll use that later.

In your sauce pan stir in the vanilla, sugar, and salt until they are dissolved. Bring the mix up to boiling and while that is coming to temperature mix the cornstarch and the remaining milk.

Take the pot off the burner and slowly stir in the cornstarch mixture until it begins to thicken. Make sure that you are stirring constantly or the cornstarch could clump up on you and leave big globs in your pudding.

Let it cool a bit a thicken some more, then either enjoy it warm or put it in the fridge with a layer of saran wrap over the top. A trick to keeping it from forming a skin is to just let the saran wrap touch the surface of the pudding, that way no air comes in contact with it.

Hopefully you guys enjoy and I’ll post some more of my recipes up soon! Till next post,

Amber