Hi friends! Today I’m going to share ten different projects and ideas I’ve collected from around the internet that you can do with little ones to get excited for the holidays. You can find pins about all of these ideas on newlyweds Pinterest here:

1. Plaster hand print ornaments and salt dough ornaments

image via roxycraft.com
Using plaster of paris sets or making your own salt dough is a great way to preserve little hands, feet, and fingerprints for years to come. Your basic salt dough recipe is one part flour, one part salt, and half part water. Another great example of salt dough ornaments is this evergreen ornament I found at roxycraft.com. Simply poke a hole in the top and bake them at a low temperature or let them dry out overnight before stringing them up and hanging them on the tree.
2. Hand print wreaths

Lots of kids make these in school but it’s fun to put a twist on them and make them at home, too. You can use thumbprints to add holiday berries and try out different colors and glitters to match the rest of your decor at home. Plus what kid doesn’t like squishing their hands around in paint? I love this example but can’t find what site it’s from other than the pinterest pin. If you know where it’s from let me know so I can give it credit.
3. DIY personalized ornaments
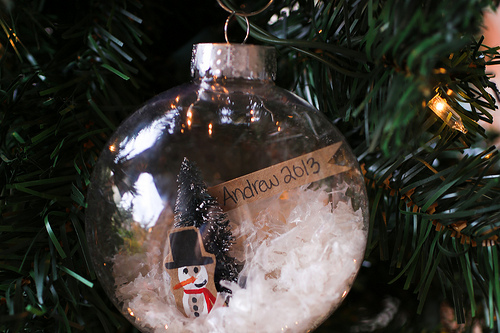
image via thenerdswife.com
There are so many different ways to make ornaments. I love these personalized ornaments that I found on thenerdswife.com. (plus what an awesome site name, right?!) You can also use clear ornaments to insert holiday family photos, small vacation keepsakes, confetti, anything you might want that’s small enough to fit. Another great idea for small children is to use a wooden abc block with the first letter of their name. Let them decorate it up and paste a photo of them on front. you can drill a hole through the corner and tie it to a ribbon to easily hang it up on the tree.
4. Decorate sugar cookies
The possibility of decorating cookies are about as endless as the possibilities of what to stick in your ornament. Let your kids help you make up the dough, and after they’ve cooled set a few aside just for them to decorate. You can even use my sugar cookie recipe here for allergy free cookies! For some extra fun stock up on some edible pearls, metallic dragées (those shiny silver and gold balls), different types of sprinkles, licorice, jujubes, chocolate chips and kisses, the list goes on. Then just sit back and watch as your child creates a giant sugary monstrosity of a cookie, lol. To keep things a little less hectic you can tell them they’re decorating for Santa, and that they need to keep it neat and make nice cookies for him!
5. Reindeer ‘food’

I think that this is absolutely adorable for small kids to do that still believe in Santa Clause. Make a mixture of oats, glitter, and birdseed and seal it up in a small baggy. On Christmas eve go outside together and scatter the reindeer food. When my brothers were little one year I went outside and left tracks in the snow to make it look like Santa and his reindeer came to see the treat we’d left outside. You can make reindeer prints easily by taking a piece of cardboard and cutting it into a hoof print shape, then hot gluing a dowel onto the back to easily press it into the snow. If you wear some big boots while you walk around it will look like Santa got out of his sleigh and walked around while the reindeer had their snacks. This is another image I couldn’t find a link back to, but clicking on it will take you to a printable pdf version in Google docs.
6. Elf on the shelf

image via midgetmomma.com
I’ve heard so much about this little elf this year it’s crazy. Apparently it’s been around for a while now but it seems to have just made a comeback. You can get your own elf here at elfontheshelf.com. Each night your elf comes alive and flies to the north pole to report back to Santa about who’s been naughty and who’s been nice. He’s full of Christmas magic, but he can’t be touched or else his magic will fade away. When the kids wake up each morning the elf is in a different place and up to something mischievous! This page from midgetmomma.com has 60 different ideas for how your curious elf can entertain your kids throughout the holiday season.
7. Design your own stockings

image via atcompanyb etsy store
If your Christmases are anything like mine were growing up, the first things to get tackled Christmas morning are the stockings. We all had the same stocking each year growing up and I love the idea of a home made, personal stocking. They don’t have to be sewn and made from scratch either. You can find plain stockings at craft stores and dollar stores and use no sew fabric glue to attach ribbons and trim. Use puffy paint and glitter paint for designs and add buttons and bows. You can do this each year or every few years and look back and see how your child’s creativity has grown over the years.
8. Design Christmas/Holiday cards

image via beautyandbeard.blogspot.ca
Christmas cards are another thing that is fun and are super easy to make. I love these from beautyandbeard that use paint chips and sequins to make cards. Some other good things to use on your cards are buttons, beads, craft paper, newspaper, ribbons, acrylic paint, stamps, pipe cleaners or stickers. You can find blank cards or card stock at just about any craft store for cheap. Add a holiday family photo to the front and have everyone add their signatures to the outside wishing others happy holidays. To keep short attention spans on track you can make each card different, or do just a few cards to send to close family members.
9. Snow globes from mason jars

image via craftaholicsanonymous.net
This project generally involves using hot glue so it isn’t necessarily ideal for small children, but it’s a great way to let their creativity shine. You can make any scene that you’d like inside these and they are really fun to shake up and watch all the glitter/snow fall to the bottom. Plan out ahead of time what scene you’d like to create or go shopping together at the craft store to pick out items together.
10. Discuss what Christmas/ the Holiday season is REALLY about
To me, this is the absolute number one thing we should be doing with our children each year. Regardless of our religion, race, gender, income or where we live in the world, it is of the highest importance to teach our children compassion and respect. Even more so nowadays when holidays are looked at as a stressful time when people rack up hundreds or even thousands of dollars in debt and seem to become more obsessed with material possessions than any other time of the year. Life goes by fast, stress builds up and sometimes we tend to overlook the little things that really make life meaningful.
The memories that stick with me from my Christmases growing up aren’t of each and every gift I got, it’s of my grandmother making us all sit in a big circle and telling us the story of Christmas. Teaching us to love, respect, and forgive each other because that’s what was done for us. I remember the giant family dinners we used to have at my great grandmothers house and playing with cousins and second cousins after scarfing down huge amounts of chicken and dumplings and mashed potatoes. When you take away all the material things, the only things we have left are each other. This year don’t just make these gifts and projects with your children, make memories with them. Teach them that the love and cheer we all want to spread during the holidays is something we should strive for year round.
Til next post,
Amber
Related articles
- DIY Christmas Ornaments w/ Salt Dough (thediyshow.com)
- 10 Christmas Ornaments Kids Can Make (blogher.com)
- Four Ways to Have Happier Holidays (wonderfultips.wordpress.com)


